Saturday, June 22, 2019

Adventures in Bike Modification

Step 1: Paint Scheme
 
I like the subdued tone-on-tone schemes found on a number of TT bikes these days, where the branding logos are less prominent, but wanted something more interesting than the over done combo of black on black.  The design was inspired by options available for Trek Project One builds, but I changed:
  • The Cannondale logo has been better centered between the chainring and head tube (in the finished build).
  • The dot pattern was constructed in ChemDraw using a P orbital lobe rotated, copied, pasted many times, resized, aligned in rows and columns that were painstakingly shifted to achieve angles that would compliment the seat tube.
  • Font, scale, and positioning of my nickname for a location Trek models don't have.
Step 2: Break down of stock build (Slice 1.0)

I didn't know how to get the plastic part off the top tube, through which the derailleur and rear brake cables ran.  I should have looked it up but I found it twisted off, which left a screw bolted through the top tube.  My shop broke down the crank and bottom bracket, but didn't know how to remove the bolted screw and didn't want to try.  I suspected one part screwed into the other but spent no time looking into it, packing the frame up for shipment to the painter as quickly as possible.

Step 3: Paint Job
 
I wanted to use a local painter but the timing didn't end up working out, so I sent the frame to Jack Kane in NC.  I relayed my shop's recommendation that he may need to check with Cannondale on how to remove the screw.  Unfortunately he interpreted that the screw insert had pulled out of the frame, and he "fixed it".  Meaning I now have a threaded insert in my frame in a place I'm not supposed to and no longer have the screw that is supposed to be screwed into the plastic cap.

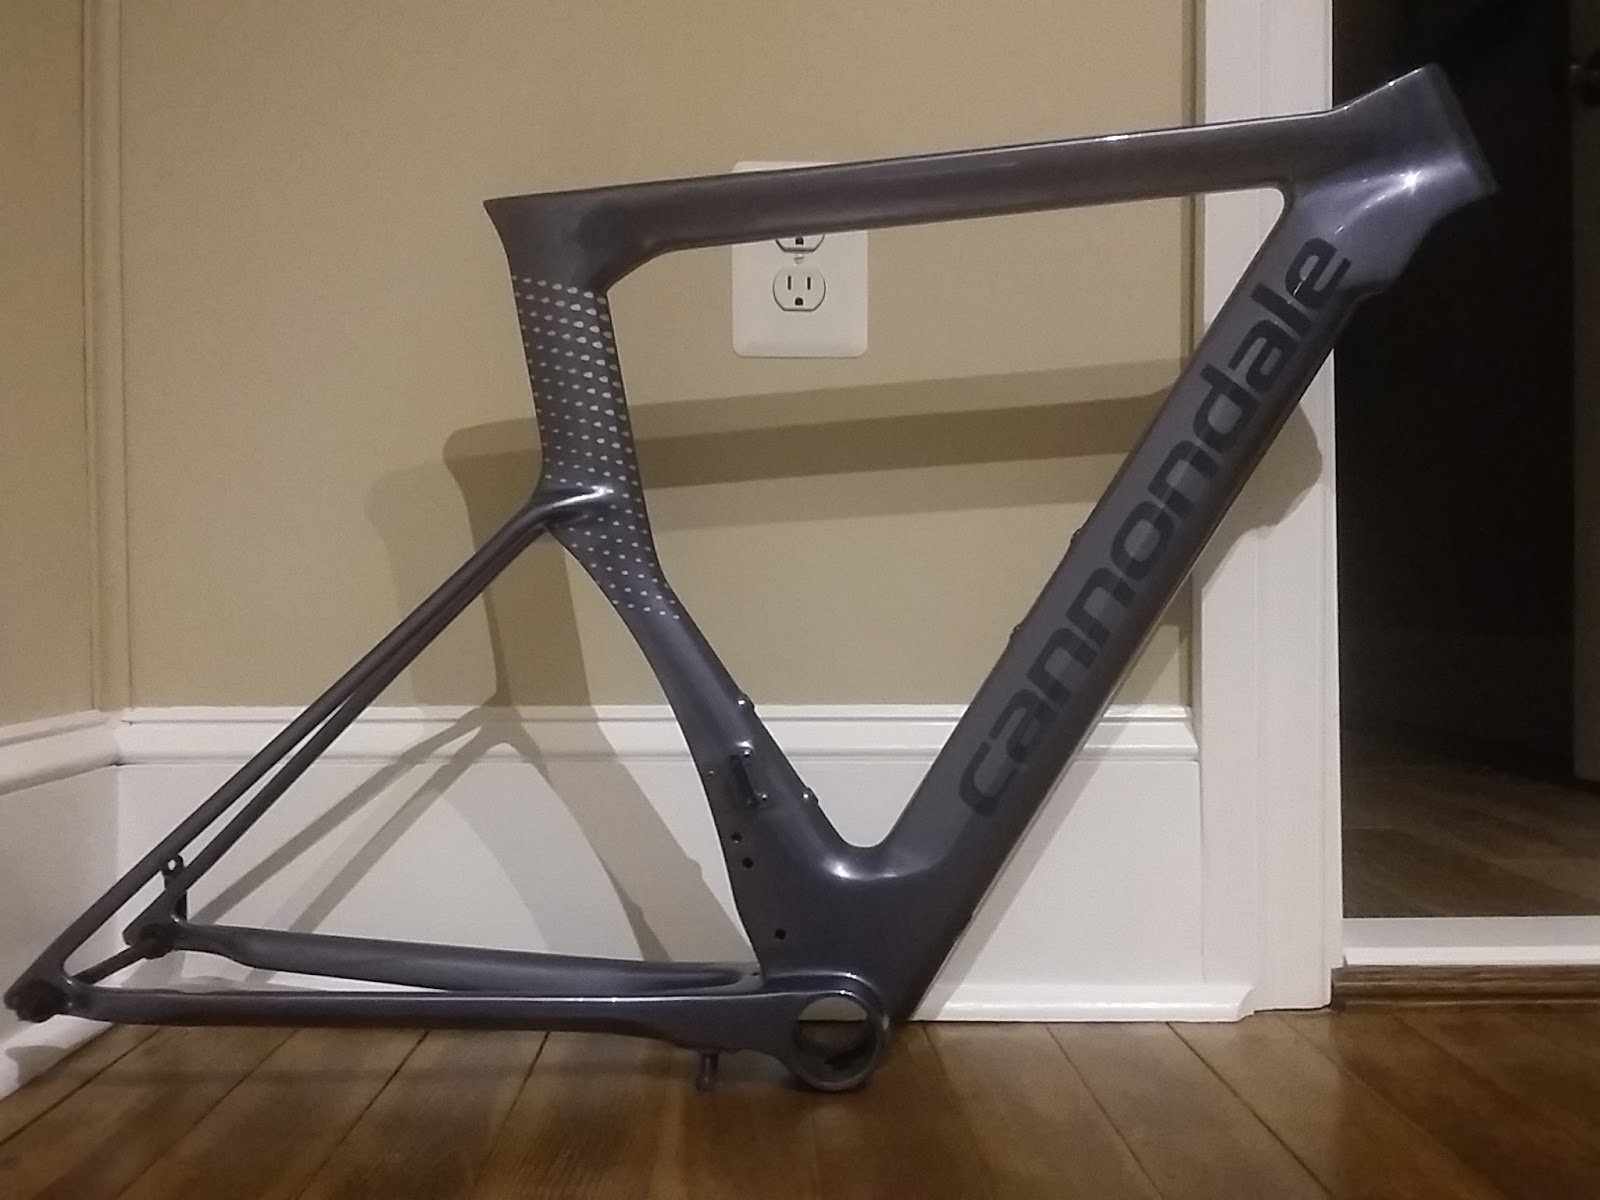
My earlier experience having a bike custom painted involved powder coating an aluminum frame; the result was a really solid finish that was robust to routine handling.  My Slice came back looking pretty slick.  The templating for the orbital dot pattern came out close to how I intended, and the color match between frame color and branding logo color was reasonably similar to what I was looking for.  Unfortunately painted carbon is less robust and I didn't even get my assembled bike from the shop without chips and scuffs to the paint.  I knew I wasn't paying for the showroom quality paint job, but I did not understand that to mean it would be so easily nicked.  :-/
The painter thought my design scheme was weird,
but I'm quite happy with it.


Step 4: Take Frame and Box of Parts to My Mechanic

Initially I intended to build the bike myself but in the interest of time, and knowing that I'd have to get help with installation of the bottom bracket assembly, I handed everything over to my favorite LBS.  This is my first custom build (of a carbon frame) and I don't know if my experience is common or not - I certainly mean no disrespect to my mechanic - but the process was really much more involved than I expected. 
  1. I described the issue with the top tube wire cover / threaded insert and shared that I thought we'd need to reuse the OEM cone headset cover as per the owners manuals.  He noted the extensions were really long and was going to cut 2 cm off.
  2. He got back to me when he started the build, saying the TriRig brake wasn't going to work on the back.  I knew he was basing this on his experience rebuilding a prior model Slice, and that he was incorrect.  The rear brake on my 2015 model is mounted on the bottom bracket and Trig's center pull brake was going to work just fine.
  3. The next update was that the 5-port junction box wouldn't fit into the stem cavity recess and he wasn't sure where to mount it.  The usual location (under the stem) wouldn't work with the 2 TriRig spacers he used in place of the OEM headset cover.  I thought we had to use the cone but he said he didn't think it fit right and the trailing wire cap wasn't going to fit at all with the TR spacers.  TriRig's website clearly shows the 5-port junction is meant to fit in that cavity, but I know some ST forum members had filed the junction because it was a tight fit will all the cables in there.  He said the rear brake line had to be externally routed or the cover wouldn't close.  My response: no way, the whole point of these bars is that all the wires and cables are hidden, so I sent him some photos and notes of builds from the ST thread.
  4. The build was ready for fitting and I went to make the adjustments so the next cuts could be made.  Trouble was, the extensions were so long I couldn't come close to reaching the shifters; at least 8 cm had to come off before I could try again.  The rear brake line had a barrel adjuster on it, which I could see might prevent closure of the stem cover.  The front brake line cable housing terminated in the stem and was run as bare wire to the brake.
  5. I picked the bike up the following day to dial in the fit at home.  The steer tube had been cut to length, a new rear brake line without barrel adjuster was installed routed through the handlebars, and the gnarly filed A junction (which still wouldn't fit inside) was velcro'd to the top of the stem cover until another solution could be found.  Jude walked me through how things worked: the Di2 charging, programming, disassembly to pack the bike for flying, easy adjustment of the brakes with an allen wrench (cable adjuster wasn't necessary).  I noted a chip in the down tube paint and that the handle bars were super floppy, no longer staying straight at all on their own.
  6. I adjusted the fit the best I could but the extensions were still way too long.  I cut 2 cm more off the back ends and dropped the bike back at the shop, asking if it was possible to cut the front ends shorter given where the bends are.
  7. He cut the front of the extensions as much as possible and angled them and the shifters how I wanted (buttons down and rotated inward, to use with my middle fingers).  Then we checked the new overall length and cut the back of the extensions again, the bar tape was wrapped, and I was off, noting again how floppy the handle bars were as they twisted around and the brake hit the head tube.  Shit, now I could see the paint was chipping around the head tube from the impacts with the brake.
 Slice 2.0, Shop rebuild.  TriRig stem spacers, bare wire to
the front brake, Di2 junction box velcro'd to the stem cover.

Step 5: Fix All of the Things

The primary issues to solve were getting the Di2 junction installed as intended, reducing the floppiness of the handlebars and preventing worsening frame damage from the impact by the brakes.  This took me weeks to sort out.  Ideally I could summarize this in a less annoying fashion than it all took place.  Alas...

1. Floppiness.  Suggestions from the Alpha One thread on ST included tightening the headset preload, using the headset shim supplied with the handlebars, and that maybe the missing stiffness was due to removal of the 2 wired derailleur cables and the plastic cap that used to cover their entry into the frame.  Upon examining the assembly, I could see the red color of my upper bearing seal visible beneath the TriRig stem spacers.  This didn't look adequately protected from ingress of water and dirt to me, unlike when the OEM cone-shaped headset cover was used.  On disassembly I found: the steer tube expansion compression assembly was slightly higher than the top edge of the steer tube, the shim supplied with the bars was already in use below the TR spacers, and there appeared to be no carbon paste on either the steer tube or inside the Alpa One clamping area.  I read TriRig's installation instructions for reassembly with my headset cover, put the shim on top of that, and applied paste as specified.  Result: some improvement, most likely due to the slight resultant shortening of the brake lines given the stock cap is about 3-5 mm taller than 2 TR stem spacers. 
Left: original headset cover.  Right: TriRig stem spacers
(photographed upside down).

2. Brake impact.  Both sides of the head tube were chipped by the blunt edges of the upper portion of the brake and I was concerned about eventual structural damage.  On disassembly I found the adapter plate (to connect the single-bolt component to the two mounts in the fork) was also cutting into the fork.  I tried sliding nalgene tubing of different diameters over the spring wire that keeps the brakes open when not in use, to act as a bumper for the frame.  However the point of impact was higher than the nalgene could reach.  I replaced that with some nalgene cut lengthwise and affixed with electrical tape to the upper portion of the brake where it hit.  I also added nalgene as washers for the bolts securing the adapter (to shim it out), and another portion taped to the back of the adapter to protect where it still touched the head tube.  Upon reading the installation instructions to ensure correct torque for the bolts, I saw TriRig supplies two adapter sizes.  Sure enough, use of the shorter one a) doesn't hit the front of the head tube and b) positions the brakes so that they don't impact the frame even when the handlebars are turned through their full range of motion.  All this really ever needed was greater attention to detail during initial install.
Longer adapter plate scored the head
tube clear coat.  The chip just above
the glare line was small at this point.
Wire cap not yet installed.

While on the topic of brakes, I wanted to change out the orange pads TriRig supplied for my grey/black ones specific for carbon rims.  I found this was impossible without removing the brake shoes from the calipers because the shoes had been installed with the pad retaining screws facing up into the brake assembly.  I reinstalled them with the screw facing downward so I wouldn't have to realign the shoes to the brake track every time I changed out my training vs racing wheels.
 Moving to the rear brake which also had the difficult shoe orientation, I found the center bolt was screwed into the frame (too long) and had chipped the paint there.  TriRig supplied bolts of multiple length, so I simply selected a shorter one that didn't impact the frame.

Incidentally, while removing the rear wheel to work on the brake, I discovered the new derailleur doesn't release the cassette as easily as the prior set up and I had a devil of a time getting the wheel off.  With the bike flipped over I found the underside of the chain stay has 3-4 chain-sized chips in the paint.  There's a screw that meets the rear of the hanger and adjusts the fore / aft rotational position of the component; I wonder about adjusting that but don't have the patience right now to sort out the trickle down of new issues that might cause.

3. Di2 junction port.  After some back and forth with the forum thread, in which TriRig and some posters indicate it fits while others say the fit for the junction is exceedingly tight even when you get it in, I spent hours considering alternate wiring configurations and locations for either this or a new junction, to achieve the all-wires-hidden install advertised for this bar.  Hours.  That alone might be worth another blog post.  And after buying new etubes of varying lengths, B junctions, and a 3-port A junction, ryryrocco posted a picture of his 5-port easily fitting into the cavity.  Turns out:
  • a) The critical difference is whether or not full housing is run to the front brake.  The internal cable housing stop that permits bare wire to run to the front brake creates a hard 90 degree bend that prevents the 5-port from fitting.  TriRig's installation instructions don't cover this topic, and the FAQ page only mentions they ran full housing, not that it was necessary to achieve the fit. 
  • b) ST poster ryryrocco is local to me & had his build done at the same shop I did! leaving me a bit miffed to have spent so much time fixing a problem that should never have been an issue in the first place.  
Sure enough, once I pulled the front brake line, installed new housing to length, and then fed the used wire with frayed end through the housing (somewhat tedious, as you can imagine), I was able to close up the stem cover with the 5-port (that I had filed as much as I dared) inside and connect my front brake line.  Ultimately victorious in the battle, but not without considerable losses of time, energy, and some $$ spent on unneeded Di2 parts.
Right: Full housing allows more play for the brake line, letting the 5-port junction fit snugly, mostly in the stem cavity but allowing the cover plate to go on.  Left: Bare wire used with the cable stop does not yield enough space inside without cutting the junction down to the circuit board.
4. Continued fit tweaks. Despite all the cuts to the extensions, the shifter buttons were too high to reach with my forearms resting flat on the pads. Potential solutions included:
  • Find new extensions with a different bend angle.  No, buying and testing out multiple extensions to identify ones of the ideal angle defeats the purpose of having purchased this highly adjustable handlebar set in the first place.  The whole idea is to discontinue the 1-off purchasing of new stems every time I want to tweak my position, so this idea was a step in the wrong direction.
  • Buy new shifters.  R9160 single button shifters are shorter in overall length and arguably sleeker than my 671's.  But I purposely chose the 2-button shifters, couldn't return them at this point, didn't want to get into re-selling them, and the 9160's would also require I buy two more e-tube wires to connect them since the 671's came with permanently attached wires.
  • Left: R671.  Right: R9160.
  • Raise the pads to be higher than the extensions.  I tested the pad risers from my original bars and they did solve issue.  However TriRig couldn't endorse this modification as safe and it seemed a bit silly to raise the pads separately from the monopost that already provides for stack adjustment.
What I did: rotate the shifters around (buttons up) to use w/ my thumbs, which made the existing length of the extensions forward of the bend ok.  This required unwrapping the bar tape to alleviate tension in the etube line.  I also cut 9-15 mm off the rear of the extensions to even them up and improve the aesthetic & gap distance to the base bar.  I consulted Shimano's installation instructions - you know, for torque spec - and found it stated these shifters cannot be used with carbon bars or extensions unless they are lined with aluminum inserts.  Good grief, no one mentioned this before.  (Shrug).

5. Top tube wire cap.  Installation of the cone headset cover made the cable holes in the top tube seem more unsightly.  Not to mention the paint here was less than perfect (visible drip in the clear coat).  I knew from my trip to Lowes that I needed a threaded insert to fit a 0.7 M4 bolt but didn't know how to spec the outer diameter.  I asked the painter since he'd handled the last one; his reply was to buy a whole new wire cap.  After purchasing a Metric Thread Insert for Wood, Solid Brass #400-M4, M4 x .375 for $0.74 plus $9 shipping, which was much too wide, I conceded that buying a new cap from the only supplier to have one would ultimately be simpler (shipped from the UK, $45 when converted to USD).

Installation was a bear.  Aside from requiring removal of the bars & fork in order to access the underside of the top tube from within the head tube, and pulling the rear brake line from inside the frame, I needed something like an allen wrench on a spring in order to allow rotation through the crooked trajectory.  It's also a tight space, with no way to get my fingers in there to guide the bolt to the insert.  Luckily the bolt head was the right size to be held by the nalgene tubing I had (which I inserted up from the bottom of the head tube), and I was able to guide the bolt tip to the insert using a twist tie I had shaped into a hook (inserted from the top of the head tube).  A few rotations of the nalgene seated the bolt sufficiently that I could pull the hook out.  Then it was a matter of snugly aligning the wire cap's insert with the frame's insert so the bolt would hold the two together without a gap.  Once again: victorious, but not without casualties (I actually broke an allen wrench and may have kicked a few things in frustration).  So for all the effort, did installing the cap help restrict the brake line and reduce floppiness?  Eh, some.  

6. Touch up paint.  While I was in contact with Jack, I mentioned all the chips and asked if I could get some paint for touch ups.  Answer: no, but I could try contacting an autobody shop.  No thanks.  I've put electrical tape on the brake blemishes to prevent further chipping and hope to learn whether its ok to put nail polish on carbon.

7. One last check for lube and paste.  Given all my post build observations, I just wanted to check whether the seat post had been pasted (didn't seem so) and add grease to my dry seat clamp bolts (pedal threads also looked dry).  So much for luck.  On reassembly, the seat post compression wedge was stripped before reaching its torque spec, rendering my bike an expensive paperweight one week before my next race.  (Deep sigh).  Thankfully I was able to overnight a new part from a US supplier (actually bought 2), and I've learned I need to get a new torque wrench before I break anything else.
Slice 2.5, My retrofit.  OEM headset cover & trailing wire cap, full housing to front brake, 
Di2 junction inside stem.


Ready for Eagleman.
Recap

The timeline from disassembly to back in my hands and ready to ride was 11 weeks, and I spent 4 more re-configuring elements of the shop build.  Below is the entire list of mods I've made to this bike.  I really which this had been less of a journey, though have come to expect that anytime one thing is changed, something else becomes an issue. 
  • Order (buy) bike without ability to test ride first.
  • Have seat post and extensions cut from their giant stock dimensions to that suitable for my size.  
  • Install the better saddle from my prior bike (Specialized Power Saddle) and new pedals (Shimano vs Egg Beaters).
  • Buy 2nd hand 700 cc race wheels listed on ST Classifieds from a guy who took weeks to bother to ship them out.  
  • Have cable adjuster installed in order to facilitate rear brake adjustment when switching between the stock training wheels and race wheels.  (I found it truly odd the bike did not ship with a mechanism for doing this easily).
  • Learn that I can't move my prior crank (Shimano) with power meter (Stages) to this bike without: a) getting an adapter to convert the Slice's press fit bottom bracket and b) changing the rear / bottom mount brake to a center-pull one that would not hit the Stages PM device.  
  • Decide that the stock crankset (Hollowgram SiSL, 165 mm length, mid-compact chainrings) is a better choice than my prior crankset anyway (172.5 mm, compact) and buy a new PM (Quark).
  • ~2 yrs later, test many new saddles and settle on the Power Arc.
  • Get ReTul bike fit which resulted in: changed cleat position and shimming (fewer shims for my shorter leg, angled shims on both sides to improve biomechanics = less knee-in pedaling and thigh rub); longer stem (the original 80 mm switched to 100 mm); bars were moved to lowest position.
  • ~18 mo later, ordered new drivetrain (Di2), new handle bars (TriRig), new brakes (TriRig), and contemplated changing frames.
  • Move to the 2018 Sitero Expert Gel saddle after ~9 mo on the Arc.
  • Frame stripped of parts, painted, and rebuilt as a new bike.
  • Reconfigured multiple elements of the build as highlighted in this post.
  • Pending: Resolve BTA hydration & garmin mount issues, discontinue disassembly / reassembly every weekend, find a way to touch up all the chipped paint, enjoy riding new bike build.
  • Future: Find a home for the pile of un-needed bike parts I have!